WHAT'S NEW at the Bold Colorful Life Estate?
|
|
The COVID-19
pandemic created opportunities to complete many new projects
and maintenance projects to enhance the estate property and
houses for our 2021 vacation rental guest groups.
|
A.
The
Projects...more
links and pictures coming
soon...
|
|
C. The
Latest
Events
|
|
D. The
New Amenities
- The New Water Treatment Systems in both
buildings
- The New WiFi system throughout the Site
- The New Larger, Front-Loading Laundry
equipment in the Cape
- The New Dishwasher in the Farmhouse
|
|
E.
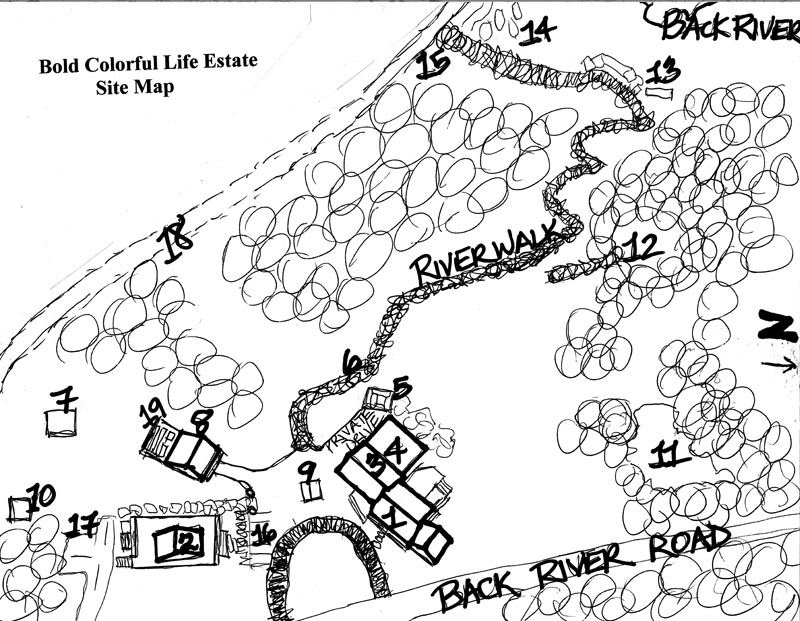
The Site Map of the Bold Colorful Life Estate
|
|
 |
|
Key to the Bold Colorful Life Estate Site Map
|
|
1. Farmhouse Guest Rental
2. Cape Guest Rental
3. Owner's Quarters- Private
4. Reception Deck- Private if not rented
5. Firepit-Open to all
6. Softwood pile-Open to all (under brightly
colored banners)
7. Sports and Games 'Room'
8. Gallery Barn-sometimes a Gallery, always
a Barn and now with a full solar installation!
9. Garden Shed
10. Large Compost Pile
11. Freshwater Pond-home to frogs and Maine painted turtles |
12. Woodland Glade with picnic table
13. Stone Bench and Stone Staircase to lower level and
riverfront
14. SIX 8.6 foot Eclipse kayaks, THREE children's kayaks on
new racks...and mulched path to
staircase to water
15. Wooden Bench which marks the end of the property,
adjacent to neighbor's driveway
16. Farmhouse Parking
17. Cape Parking
18. Neighbor's Driveway-please avoid trespassing
19. Organic Raised Bed Vegetable Gardens
|
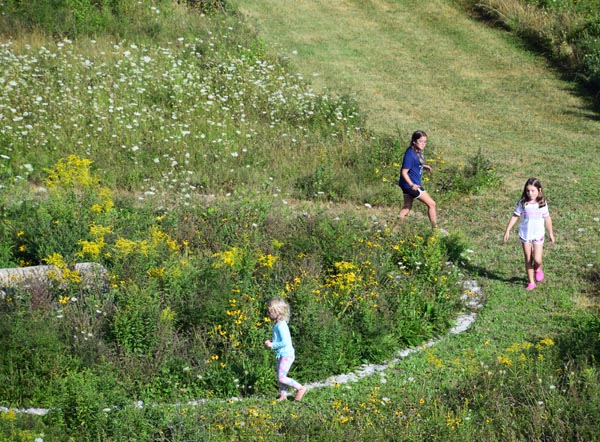
The Labyrinth at the Bold Colorful Life Estate and Retreat
Center is a double five-circuit
classical path marked with smooth stones from the US and
Canada for foot massage and reflexology...divided by
wildflower channels for sensual enjoyment.
It
is a pathway for walking, reflecting and healing…a journey
of twists and turns leading to the center bench, to discover
something about ourselves, about relaxation and about Mother
Nature.

A Labyrinth is...
-a wondrous pathway that may become a mirror for
our own lives and metaphor for our spiritual journey.
-a circle and spiral, each a powerful and ancient
symbol of wholeness and transformation.
-a tool of spiritual growth, healing, conversion
and transformation of heart, body, mind, and spirit.
-a spiritual discipline of setting one foot in
front of the other and following the path.
-a calling forth of our intuitive symbolic mind
and creative meandering spirit.
-a grounded yet symbolic space which can awaken us
to the eternal and infinite mystery of the divine imprint
within all creation.
-a deeply healing container where we can touch our
joys and sorrows.* |
*quote
from the Labyrinth at Rolling Ridge
Here's the story of the creation of this Labyrinth.
|
|
For the
last 10 years or so, I felt drawn to have a labyrinth on site,
for summer guests, as well as off-season retreat guests. As the
estate evolved during that time, other projects took precedence,
and I contemplated different sites for the labyrinth. The
Fairy Walk
was completed and then the Enchanted Trail was extended. The 50
Forest
Bathing sites were laid out on the property on both sides of
Back River Road.
Last
Autumn, I knew that the labyrinth must be placed on a
well-drained, centrally visual site and that led me to the
middle of the large wildflower field just east of the Back
River.
I chose a
labyrinth design, and placed two large tarps on a 33 foot area,
planning to kill off the grass and wildflowers during 2020 and
build the labyrinth in 2021. But that wasn't to be. |
|
 |
 |
|
When the
CoVid-19 pandemic hit in spring of 2020, it became clear that it
was time for the Labyrinth to be built...for enjoyment by
eventual guests and for my sanity during Maine's state lockdown.
|
First, I hired a helper to help me drag a foundation stone into
the middle of the tarp circle while the ground was still frozen
in March...and we placed the large stone on two support stones
and I filled gravel under and around it.
I pulled out the drawing that would guide me for the next 3
months and bought some cement forms online. They were 17" wide,
and I decided that the wildflower strips between the walking
areas should be 12". That would nicely fill the 33' expanse I'd
laid out earlier. |
|
 |
 |
|
The design
layout was first done with ashes from the pellet stove, but it
was a rainy (and snowy) spring, so those guide lines didn't last
long. |
 |
 |
|
Out came
the fluorescent pink paint can! |
 |
 |
|
 |
|
And since
I wanted the edges firm and straight, it became clear that I'd
have to cut turf blocks about 2.5 inches wide and 2 inches deep
on both sides of the walking area. I found an excellent machete,
just right for my needs and spent HOURS on my knees, cutting the
blocks. I put the turf blocks on the wildflower areas so I'd
keep them straight in my mind. And things began to get visually
clear.
(I ended up
putting the turf blocks on a low, easily flooded path into the
Glade area, so that walkway was raised.)
|
 |
 |
|
Once the
edges were cut, it was time to rototill the center, which would
speed up the process. I had a helper or two along the way, but
this was hard labor and they didn't stick it out.
|
 |
 |
 |
 |
|
After the
rototilling, it was back on my knees for days of cleaning out
the interior of the walkway so that the cement forms (bottom
right in the picture below) would fit and be level. This was an
excellent reason to be outside every day, being productive while
the outside world was 'on hold'. |
 |
 |
 |
 |
|
At last,
the walkway was ready for the cement stepping stones, to be
embedded with smooth stones from the US and Canada.
But
my first visitors were the local deer family...and it dawned on
me that I had better seed the middle parts with deer-resistant
wildflowers. I had no interest in inviting my deer visitors to
tromp on the walkway steps...especially when the cement was
curing. So I seeded the other parts of the lawn with wildflowers
the deer love...and deer-resistant seeds on the walkway...and I
keep my fingers crossed. |
|
 |
|
The first
stepping stones were made according to the form instructions,
where you insert the cement through the top of the form, pushing
into the corners. This was done on the walkway itself. My wrists
grew tired of this quickly and this simply didn't strike me as
an efficient way to do this, so I slept on it.
I was
lucky to find a neighbor, Rick, whom I could hire to help with
this stage of the process and we talked it over and decided to
build the forms in the barn, so we wouldn't be dependent on
Mother Nature for good weather. |
|
 |
|
Here's how
the steps looked after we built them in the barn. I added the
smooth stones before they began to cure, so that they would have
a good connection when people walked over them. You can see the
forms to the right of the trailer. |
 |
 |
|
But this
was still a tedious process, despite sprightly conversation with
Rick. And it was heavy for me to drive the full trailer to the
walk and then distribute the steps.
Again,
I slept on it and woke with a wild idea. Why not fill the forms
from the underside and then flip them onto a plastic-covered
wooden base and slide the plastic into place on the walkway?
Both dubious that this would work, we tried it. AND IT WORKED!
It probably saved us half the time...and we began to make good,
steady progress. |
 |
 |
 |
 |
|
Days
later, we had filled all the form-sized areas, and I was filled
with gratitude as I said goodbye to Rick. But the forms were
designed for straight walkways and, except for the first and
last lengths, this labyrinth is continually curved, so I had to
dream up a way of making strange-shaped steps to fill in the
blank areas. Each night, I had to wet the cement to help it
cure, so I could study the challenge up close. |
|
 |
 |
 |
 |
|
At last, I
figured out how to fill all the walkway holes, mixed up the last
two mixers-full of the cement and created the strange ones. As
they cured, it was time to get the marble stone chips to fill
the larger cracks. Altogether, we had mixed up about 6500 pounds
of cement to make all the step components. |
|
 |
|
Once the
marble chips had filled the larger cracks between the cement
forms, it was time to spread the paver sand...and fill in any
areas with dirt where the walkway was too wide for the forms.
Below, the marble chips are between steps on the right, and then
sand has been added on the left. Altogether, I hauled about 700
pounds of crack fillers to finish the walkway. |
 |
 |
|

|
|
One other
thing became clear as the walkway neared completion. If people
took off their shoes to enjoy the stone massage, they were NOT
going to like the gravel that I had placed around the bench to
keep the weeds from growing there. So...time to re-design the
seating area was next...using the machete to cut down the grass
level, extending the fabric, moving the gravel out to the
edge...and then placing these wonderful celestial blue tiles I'd
found at the Habitat for Humanity store in Rockland. They mirror
the sky, and also evoke and honor the honeybee in all its
glorious honeycomb production. |
|
 |
 |
|
It's
complete...it looks ancient from above...something from the age
of Stonehenge perhaps.... |
|
 |
|
Clearly,
this was a magnificent labor of love...emphasis on labor and
emphasis on love. I water the wildflowers every night, urging
them to grow and thrive and make this an awesome place for
spiritual peace.
Do come
and visit and enjoy this bold and soon-to-be-colorful labyrinth! |
|
 |
 |
|
Addendum-July,
2020: As the wildflowers grow during the summer, the labyrinth
becomes more mysterious. And it becomes more attractive to the
local wildlife. SO MUCH for ordering special deer-resistant
wildflower seeds! |
 |
 |
 |
 |
|
And we have a new
neighbor...what I thought was a small porcupine turned out to be
a woodchuck! |
 |
|
But thankfully,
vacation rental guests are also enjoying the labyrinth...when
the wild critters can spare the site. |
 |
|

|
 |
|
|
